Depending on the perspective of the different people in my life I am many things: a son, a father, a brother; A student, a teacher, a mentor; A friend, a colleague, a training partner. And yet, in all these capacities I have learned one lesson well, and seen it play out repeatedly. Failure is critical for growth, and letting loved ones fail is one of the hardest manifestations of loving them that there is.
This is never more acute than when it comes to your child. It is one of the most painful struggles in normal parenting. Seeing that a child is making poor choices and is therefore on a path to failure, letting it happen, and watching the fallout is heart-rending. And yet, the alternative is worse: Letting them believe that there is always a safety net.
As parents, it is our job and our duty to give our children all the tools and guidance they need to succeed as they grow. But it is not our job to give them success. It is not our job to undo their failures, or to mask them as something else. In fact, any “success” that is not earned is not a success at all, and any part we play in delivering these false successes is, in fact, failing in our duties as parents.
Repeatedly and consistently rescuing a child from failure teaches them that failure is not on the table. It teaches them that life will be fine regardless of poor choices, lack of knowledge, or lack of skill. It’s like giving someone voice lessons and using autotune to correct their pitch before playing back their singing to them and to the world, letting them believe they are the next Freddy Mercury or Whitney Houston, and then letting the world watch their train-wreck audition for American Idol. It not only sets them up for confusion later in life, it inhibits self-awareness to the point that life in the “real world” will for them will seem like walking through a minefield, where the reactions from others are so completely out of line with their internal measures (calibrated in their youth) that they can, at times, feel like they never really know what is wrong with them or why they get the responses they do. Consider those American Idol auditions where the singer is so clearly awful, and yet they think so highly of themselves that they tell the judges it’s the judges who are terrible.
The thing is though, that in the moment failure is happening, we parents want nothing more than to take the pain away. Every parent knows what I mean. Your child’s pain, whether physical or emotional, is about a million times worse than your own. My wife always talks about that moment when a toddler is running to you in the park to show you some amazing treasure they found, with that big toddler smile and enthusiasm, when they trip and fall and start crying miserably. We all want that enthusiasm and joy to be the only thing they ever feel. We never, ever, want them to fall.
But it’s unrealistic. Everyone falls. Learning what caused it, analyzing how to have avoided it, and recovering from it are the real lessons. The lessons that lead to a person who truly can be successful. And so we have to let our children fail. And then we have to be there for them to love and support them as they recover from it. We have to show them that failure isn’t the end of anything, and that even in their failure we believe in them and love them as much as we always have. That is how they will learn to grow from failure, without spending a ton of counter-productive energy and emotion on self-recrimination and shame.
In my years of teaching, I have had countless conversations with parents concerned about their children’s academic success – or lack thereof. And on more occasions than I care to count, a parent has outright asked me if there is anything I can do to raise their child’s grade. These parents are always taken aback when I tell them that there is nothing I can do, and nothing they can do either. However there is everything the child can do. We can give them the tools, we can be there to support their learning. We can be the best parents and teachers there are. But we can not “raise the child’s mark”. That is on the student. And sometimes, the student fails. When I tell the parents that I am willing to let that happen, they often think it means I am a bad teacher. There have been a few occasion where they said so. But my response is always the same:
“I am being the best teacher I can be. I will always be there to support your child. I will give them every tool I have, and the guidance to use it, in order for them to succeed. When they need me, I will be there. I will be there even when they don’t realize they need me. But I will never do the work for them, and I will never assign a grade they did not earn. And if they should fail, I will be there to support them and help them see what went wrong, and how to address that in the future. Given all that, my only hope is that your child will look back on their time as my student and realize the gift I gave them: The gift of letting them fail.”
We want the next generation to be resilient, strong, caring and educated. Failure is the path to all of these. As hard as it is, we need to let our children fail.
And then celebrate the heck out of their successes!
Growing up I had a lot of strengths for sure. I did pretty well in school, had a good sense of humour, a loving family and was always blessed with good close friends. But one thing was definitely not a strength: athletics. There was never a team sport where I didn’t get picked last and I certainly never cut that dashing athletic figure that some kids seemed to me to have been born with.
(BIG side note here – the large majority of adults you see that have that dashing athletic physique were NOT born with it … but I learned that little tidbit much later)
As a young child I was sick with asthma, and so I was always very thin. When I hit puberty and my body started demanding more food I began to fill out, but not in any good way. I just got fat. And as I got older it got worse. When my son was a baby in the late 90’s I couldn’t carry him upstairs to his change table to change his diaper without stopping to catch my breath. I have a vivid picture embedded in my mind of him lying on the change table in a dirty diaper and me standing over him huffing and waiting to catch my breath before I could change his diaper. All from carrying a 15 lb baby up a flight of stairs.
I won’t bore you with too many more details. I just wanted to paint a picture of who I was – a smart, funny, happy, fat guy. I experimented with different diets with varying degrees of success. One which I did fairly well with was The Zone diet, which took me from a size 40 waist to a size 32. And that was the beginning of my interest in the gym.
At first, my goals were all about looks. After losing all the weight on The Zone I found I was just skinny. I wanted pecs, shoulders, and abs. I joined a little gym near my house and applied the same dedication to working out that I had applied to adhering to the diet. The owner was a former competitive bodybuilder and a bodybuilding judge at the time. I knew nothing about working out and I was happy to let him design workouts for me. With his background he naturally designed workouts with bodybuilding in mind. Being a tech nerd I typed them into excel and shrank it down so I could tape it to the inside of my logbook. It’s still there though I’ve long since moved on to other plans.
These are the workouts the owner designed for me. I taped them to the inside of my journal so I’d know what to do.
I remember asking him how long it would take for me to actually see results. He said about 3-4 months. Great! I put my nose to the grindstone and did everything he said, and marked it on the calendar. I still have the log book I used when I started.
I did not see results after 3-4 months.
Now that’s not because the gym owner was lying. Most people should see results after that length of time. But I learned that my body is not “most people”. And that revelation may be the single most important thing the gym has done for me. I did not give up. I knew I was working hard and although maybe the mirror didn’t show much of anything, I was enjoying the workouts and loving the feeling of pushing myself past limits. Here are some entries from the very front of my logbook:
Here are some log entries from my first workouts. Back then I did not include the weight of the bar – I didn’t know how much it weighed. Seriously!
If you’re having trouble deciphering my handwriting join the club. My students love it. Here’s what it says (I’ll add the weight of the bar in, now that I have that capability)
Deadlift: 95 X 5, 115 X 5, 135 X 5
Leg Press: 90 X 8, 180 X 8, 270 X 8, 320 X 6
Close Grip Bench Press: 65 X 8, 95 X 8, 95 X 7, 95 X 6
Squats: 115 X 12
Bench Press: 95 X 8, 115 X 6, 155 X 8
1-Arm Dumbbell Rows: 40 X 5, 40 X 5, 45 X 5
These were big lifts for me, although looking at other lifters I knew they weren’t big lifts. I had to make a choice pretty quickly: keep comparing myself to others, let the depression set in and give up, or compete with myself and celebrate my victories. It wasn’t an obvious choice, despite what all the self-help and life coaches will tell you. I had gotten through life to that point without being a lifter and I could certainly rejoin the masses and be happy and healthy. Maybe take up running.
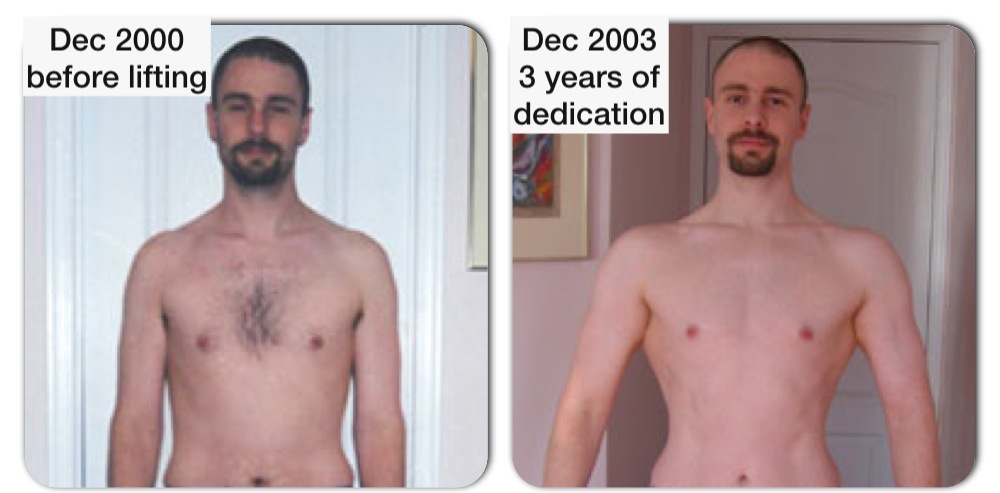
But that was not the choice I made. I wanted to get better. I had to get better. Better and best are two very different words. Better is a journey. Best is a destination. And since living is a journey, I’ve always chosen better. I don’t need to be the best, though I can’t say I mind when it happens. But I always need to be better. I despise stagnation. So I accepted that my body is mine, and I kept at it. I also took lots of progress pics, for which I am very grateful. Here is a comparison of just before I started lifting to how I looked 3 years later:
The difference 3 years of dedicated lifting and good eating made to my physique.
There are changes, but they’re not drastic. If we are being honest most of the difference between the two pictures is how I’m standing and the fact that I shaved my little patch of fur. However there is some delt and tricep development noticeable, although it’s very slight.
I’ve been immersed in the lifting culture for 13 years now. I know that some the people reading this are thinking Dude, if that’s all 3 years got you then you were not doing it right. But here’s the thing, and you can take it or leave it. I was “doing it right”. I was lifting consistently 5 days a week, improving my lifts constantly, eating 5-7 meals a day, making sure to eat 1-1.5 grams of protein per pound of bodyweight, and all those other things one is “supposed” to do. And that’s what I got. Because that is my body. It resists change. But it changes.
Fast forward to today. I’ve had lots of victories and lots of defeats. I’ve been injured a few times, had my motivation ebb and flow, and of course I’m 13 years older. I’ve changed careers, pursued passions and experienced lots of joys and sadness. But this whole time I have been a lifter. And here are some lessons I’ve learned. I like lists so I’ll give you my thoughts in list form.
Compete with yourself
In all areas of my life, I never compete with others anymore. I always compete with myself. When I do something I’ve done before, I always work my hardest to make sure I do it better. Whether it’s academics (I just completed a Masters degree), my career (every time I teach a lesson I use what I learned from previous ones to make it better), my singing, or pretty much anything. I don’t always beat the old me, but I always try to. And when I fail, I learn.
Think long term It’s very easy to get bogged down in daily routine and get stuck in status quo. But each day should be about advancing yourself in some small way. Make a plan. Stick to the plan. You may not see changes or progress from one day to the next but if your plan is solid you will see progress in the long run. Never forget your plan. When you suffer setbacks acknowledge them as setbacks. There are peaks and valleys but if you zoom out you will see the steady rise.
Don’t set artificial boundaries You can always decide that you are fated to remain a certain way. But what a shame that is. Always aim high. If you set boundaries on what you can do you’ll live within them. It’s not necessary.
All of these things are things I learned in the gym, and apply to my life. They are not the result of a seminar I went to (or a blog I read…), they are the result of my results in the gym, so I don’t have to convince myself to believe them because I live them. I am so grateful for this.
So now, although I certainly don’t complain about changes to my physique and I do want them, I don’t lift for looks. I stopped lifting for looks a very, very long time ago. I lift because of what it teaches me and how it affects my mindset in life.
Oh, I almost forgot (no I didn’t! ;)). Planning long-term and acting on that plan works. It’s the zoom-out that proves it. After 13 years of lifting, I can zoom out a bit. I have gotten results in my lifts and my physique! Incremental at the time, they sure do add up.
Here are some updated lifts from workouts over the last few months. For most I chose lifts I have video of:
Deadlift: 405 X 4 (here’s video)
Leg Press: 900 X 10 (I don’t have video of this)
Close Grip Bench Press: 265 X 5 (here’s video)
Squats: 365 X 4 (here’s video)
Bench Press: 295 X 4, 315 X 1 (here’s video of the 315 X 1, it’s a personal best)
1-Arm Dumbbell Rows: 140 X 5 (here’s video)
And here’s a progress comparison picture after 10 years of lifting:
I lift weights, and I love it. I haven’t always been consistent with it though. I started a few times. First when I was a teenager, and then again when I was a newlywed, and then again when I was in my early 30’s. It was that last time that stuck, and here I am at 43 still lifting (currently recovering from an injury 4 weeks ago, but I am still a lifter). At first, I would go to a commercial gym, and I learned a lot there about what the different machines are for, what movements to do, and how to lift with good form. I loved going to the gym, but after a while I wanted the convenience of being able to train at home. I didn’t want just any home gym though. I wanted a home gym that would totally replace the commercial gym. I have one now, and this is the story of how it came to be. It started in June, 2006.
Rich’s Home Gym, aka “The Dlingeon” Version 1.0 (June, 2006)
First things first, I needed a space. We had recently moved into a new home (brand new that we chose from architectural plans), and a big criterion was that there be a good space in the basement for a gym. Our basement has just that. When you go down the stairs and turn right there is a big open area with a walkout to the backyard which is great for a family/games room, but if you turn left there is a smaller perfectly rectangular area that my wife and I knew from the get-go would eventually be the home gym. Check “space requirement” off the list.
Next on the list – flooring. It’s just not a good idea to put a home gym down without the proper kind of flooring. In a basement, you are probably dealing with concrete as I was. This is good because it’s hard to seriously compromise concrete, but if you don’t cover it with something you’re asking for dust, concrete chipping when you drop weights (and you will if you’re doing it right!), and cold feet. Ideally you’d want some heavy-duty rubber mats like they have in commercial gyms, and initially that was my plan. Then I found out how much that costs. To cover the whole floor would have cost more than the gym equipment I planned to buy! So I scaled the 1-inch thick rubber down to two 4X6 mats, for deadlifting, and for the rest I bought the children’s play-area interlocking foam. One side is colorful, the other is black. I opted to have the black side facing up. Check flooring off the list.
Next – equipment! My goal was to spend as little as possible to get as much as possible. That’s usually the case. I did a lot of research and initially wanted to get a smith machine since it’s safe for training alone, and provides a lot of options, especially since you can add options with pulleys etc. But smith machines are quite expensive and when I went shopping I discovered the leverage PowerLift system by BodySolid. It had a pressing station, a curling and pulldown station, and a hack squat station. Plate loaded and extemely well-designed. And the best news was that I could come in under-budget and buy a power rack. I bought the PowerLift, power rack, a bunch of weight plates (2X2.5, 2X5, 4X25, 6X45) and I was set. This was to be the last time I would make a major gym purchase retail. If I had known then what I know now I never would have gone to a store. But more on that later. Check equipment off the list.
The PowerLift still in the boxes. This was an exciting moment!
Sept. 2006. Rich’s Home Gym v1.0
In the pictures you can see where I set up the power rack and the heavy duty mats. It’s the perfect spot for it as there is just enough width and depth to be able to train in the rack and load/unload weights comfortably, with literally not an inch to spare. “Not an inch to spare” is a key characteristic of a good home gym. I don’t remember what the total cost was, however I have a vague memory of having done all this for around $1600. Not bad.
Here’s a quick video of me using the PowerLift in 2007. I used to time my rest between sets, so you’ll see me hit the button on my high class Casio after the set.
This is a good time for a detour into how I paid for all the rest of the evolution of the gym.
How Math Built My Gym
From a budgeting perspective, the money I spent on the gym at this stage was money my wife and I had allocated for a home gym for me, and I had a pretty complete gym. From that time on, any money I wanted to spend had to come from “non-family” funds. I do a lot of math tutoring so there’s a source of income that is “extra”. When I tutor though, my wife and kids have to stay quiet, because I tutor in our home in the dining room. Our house is not very big. Any noise in the house is heard in the dining room, no matter where the noise originates. I have to tutor in the dining room because it is in plain sight of the front door, and it’s important to me that parents of the students I tutor know that at any time they could walk up to the door and see us. Teachers will understand that sadly, these are things we have to consider whenever we know we are going to be alone with a kid who is not ours. A long time ago my wife and I sat down to discuss tutoring funds, and we decided that the whole family contributes in their own way to my being able to earn that extra money. So we decided that what made the most sense to us is that whatever I earn, 50% goes right into family money. Of the remaining 50%, half goes to my own discretionary pile and the other half goes into my wife’s discretionary pile. This is money that either of us can spend on whatever we want without having to consult or feel guilty that a frivolous purchase was made at the expense of something the family may have needed or wanted. I use it for things like casino trips, electronic toys that only I care about, and gifts for my wife (she uses hers on gifts for me among other things). This stash of money was to become my source for the rest of the improvements to my gym.
Dlingeon Version 1.01 (June, 2006)
At some point early on I realized I wanted to be able to do what I call corner rows. Easy enough. Using money I make tutoring math, I bought a v-grip cable handle (still retail), and put a piece of foam in the corner to protect the barbell and the wall. Many people say you need to anchor the barbell for this movement, and I suppose that would be safe, but I have never done so and never had a problem. Because of the way I lean back when I start, it gets jammed into the corner pretty good and I have never had it drift up, even with as much as 5 plates loaded on the business end. Here’s an early vid from the same day as the other video of me performing this movement.
Dlingeon Version 1.1 (July, 2007)
I loved that PowerLift a lot, but I began to really miss a few items. First and foremost, dumbbells. Secondly, a dip stand. My first solution to the dumbbell dilemma was to buy two spin-lock dumbbell handles and enough 10 lb plates to load them both up to the hilt. I also bought four 5’s and four 2.5’s for maximum flexibility. These were standard handles, not Olympic, since Olympic dumbbells are actually kind of annoying. But it meant that I had to buy standard weight plates. I did get these retail, but it was not very expensive. Maybe $100 total. Plus side: I could now create dumbbells from 5 lbs to 85 lbs (85 was a tight squeeze). Minus: I had to load them manually and no matter what the handle always sticks out so if you’re doing presses that start on your thighs it can get awkward and painful.
Weight plates, PowerLift attachments, and spin-lock dumbbells
As for the dip stand, I did end up buying retail. I bought a basic Northern Lights dip stand which as I recall was $125 at the time. I put it in the corner where I do corner rows. You can see the foam piece I use to protect the wall. Only a minor inconvenience to have to move the dip stand to do corner rows.
Northern Lights Basic Dip Stand
My mother also bought me a cool clock for the gym. It was shaping up. So was I!
Gym Clock – “I KNOW IT HURTS”
Dlingeon Version 1.2 (April, 2008)
One of the fairly predictable side effects of lifting weights is that you get stronger. When I first started lifting in my 30’s I used to look at guys that could press the 70 lb dumbbells and think they were monsters. The dumbbells in the gym I joined at the time went all the way up to 100 lbs. I remember how those 100’s looked like caricatures – gigantic. I also remember that when the owner gave me a tour of the gym prior to joining he told me the dumbbells “only went up to 100 to keep out the goons.”
Well there were only two guys I ever saw pick up and use those 100’s and they seemed like goons to me. I guessed if you could use bigger dumbbells than that you were an übergoon. I never dreamed I’d get to that stratum of goondom but working out regularly for years will get you there if you do it right, and the time came when my 85 lbs worth of dumbbell flexibility was not enough. I needed heavier dumbbells. I was a goon.
Here’s the thing about dumbbells though. They really cost a fortune. They’re generally sold by the pound, and when you’re looking for 90 lbs and up that adds up in a hurry (side note, if you want to find out how much a set of dumbbells from 90 lbs-120 lbs in 5 lb increments will cost at $1.50 a pound you could add it up one at a time or you can use an arithmetic series to simplify the calculations – you can guess which method I use). There was clearly no way I would pay retail. Thus began my love affair with craigslist and kijiji. Not many people are selling heavy dumbbells, and of the people who are they are often still asking quite a bit of money, but with patience and diligence you will eventually find what you need at a price you can afford. And I did. I found a guy who was selling a set of 95 lb – 120 lbs in increments of 5 lbs for under 50 cents/lb. At the time retail was over $1.50. I drove to his house, loaded them up into my wife’s Honda Pilot, and brought them home. I was so excited to use them! I was not strong enough to use the 120’s for anything but one-arm dumbbell rows yet, but I could press the 95’s and fairly quickly got up past the 100’s.
Übergoon! Heavy Dumbbells, 95 lbs – 120 lbs
Dlingeon Version 1.21 (July, 2008)
Anyone who has ever lifted heavy dumbbells will tell you that it’s not the most fun when they all live on the floor. So began my quest for a dumbbell rack. When you’re trying to build something of quality on a tight budget you really start to think carefully about maximizing the utility of each dollar you spend (keep in mind, every dollar I spend on the gym is a dollar I can’t spend on an iPad or Dolby Digital Surround System). One of the things that I really started to realize was that there would be items I’d need or want in the gym that were not directly used for exercise. I didn’t want to have to pay a lot of money for those. I looked at retail dumbbell racks that could hold heavy dumbbells and they just cost way too much for me to justify the expense. I once again used patience and craigslist to stumble upon a guy who was selling a custom job that was seriously heavy duty, and also had a shallow footprint, which is key in a home gym with limited space. He was asking $150 and I bought it for $100. As a plus, when I got there he had a pair of 140 lb dumbbells that he had no use for and offered them to me for $25!! Easy decision, even though to this day I’ve never pressed them. I have used them many times for rows though. They look so hardcore too sitting on the rack.
The icing on the cake was when he offered to let me use his truck to bring it all home. He and his brother helped me disassemble it, then load it up, and they followed me back to my place where they helped me carry it in. I reassembled it myself. It’s not hard to do but when you have a home gym you start to learn quickly there are a few tools you want to make sure you have. A ratchet set, a wrench set and a set of Allen keys found their way into my toolbox that day! I can’t even count the times I’ve used them since.
Custom dumbbell rack, along with new 140 lb dumbbells the guy I bought the rack from threw in for $25.
Dlingeon Version 1.22 (August, 2008)
One exercise I absolutely love to do is the deadlift. Anyone who has done it for any length of time will tell you how great it is for building all around strength and size. However they will also tell you that it takes its toll. One way around this is to not deadlift every week. When I was in a commercial gym I would alternate deadlift weeks with weighted hyperextensions. This both alleviated the stress of deadlifting too often and also had the bonus of strengthening my lower back so I could deadlift heavier weight! In my home gym I had no good replacement for hypers. So I needed a hyperextension bench. But again these are tough to find used, and to get a commercial quality one retail was out of the question. Once more patience and diligence worked in my favour and I eventually found one for $40. A Lamar. Lamar is a fitness equipment company that made great quality stuff for home gyms, but unfortunately went under (from what I’ve read it had nothing to do with their product and everything to do with a crooked accountant). If you can find Lamar equipment that hasn’t been abused, buy it! It’ll usually be for a great price because it’s not a well-known name thanks to the company’s quick demise and so it’s priced well under comparable stuff from companies like Hoist, Precor, BodySolid, etc. This bench has adjustable everything, including the angle which adjusts from 45 degrees all the way to horizontal.
The dumbbell handles with screw-lock were an okay solution for the price, but they have their drawbacks. First and foremost, the bar sticks out way past the weights, and it digs into your thighs if you want to do dumbbell presses with them starting with the weights on your knees, which is really the only way to do it when you train alone. Even if you offset the dumbbell so the bar isn’t digging into your thigh the screw-lock still does. So I had been trolling the internet for a used set for a long time, waiting for the right set at the right price. It finally came in the form of a guy who had a set custom made for himself in the 80’s by a friend who had a body shop. The guy had stopped lifting years before, and had stored the set in his basement. There was quite a bit of rust on them so he knew he couldn’t get much and was asking 50 cents/lb for his set which went from 25 lbs – 105 lbs in increments of 5 lbs, but for some reason was missing the 75’s. I offered him 30 cents/lb and he took it. My friend drove over to the guys house with me and we loaded up the dumbbells into my wife’s van and his station wagon, and once again when I got home I had the pleasure of multiple sets of farmer’s walk from my porch through the living/dining room and down the stairs into the basement. Note to anyone who ever does this – start with the heaviest ones! Otherwise by the time you get to them you won’t be able to move. Also, warm up. It’s a serious workout.
Once they were down my rack was finally put to full use. Here’s a pic. I had originally intended to restore the dumbbells by removing the rust and repainting, but to date I have not had the time or inclination, and the dumbbells work just fine anyway.
Full Dumbbell Set – 25 lbs – 140 lbs. Rust is free of charge.
another pic – the set was too big now to fit in one frame!
Full Dumbbell Set – 25 lbs – 140 lbs. Rust is free of charge.
At first I had decided to put the heavy dumbbells on top, since it’s actually a bit difficult to get them out of the vertically oriented rack from the bottom. That is what you see in the picture. However I did eventually move the heavy ones to the bottom because I worried (probably unnecessarily) about the centre of gravity of the full rack. Note those awesome 140’s at the top right! I do use them. Here’s a video of me rowing those bad boys.
Dlingeon Version 2.0 (November, 2008)
The PowerLift was a great gym, but it had some issues which over time I realized were becoming more than I wanted to deal with. For one, when you’re doing chest presses using a leverage system, every set always begins with a rep at the bottom of the range of motion. Imagine starting a bench press with the bar at your chest instead of at arm’s length. This is not technically a terrible thing, but I found as I got stronger that the weight I had to use so that I could start the set was significantly lighter than the weight I would use if I could make it heavier once I finished the positive portion of the first rep. I started to load heavier weights on and struggle to get the first rep but then the rest of the reps would be smooth. I injured my shoulder doing this, and it was quite a significant injury that kept me out of the gym for a couple of months.
Another issue I had with the PowerLift was there was no good way to do a flye movment. There were bands you could attach to the arms of the pull station, but you weren’t pulling in the direction of the resistance. A flye is supposed to be from the outside in (or the inside out) and the resistance should be in the opposite direction of the pull. With bands attached to fixed arms the movement could be done but the resistance doesn’t work against the flye. In other words, I really missed the cable systems at the commercial gym where you could do crossovers. It wasn’t terrible since I had dumbbells and those are great for flyes, but there are times when you’d like to use a machine.
I also looked at the footprint of the PowerLift and decided that in the long run I would regret how much space it takes up. There was equipment I knew I’d eventually want to get and there wasn’t room for it as long as the PowerLift was there. So I made the decision to sell the PowerLift, which I did for about $200 less than I paid, and I bought a Nautilus Smith machine used for significantly less than I made selling my PowerLift. This was the beginning of me using my existing equipment to upgrade to new equipment, usually without being out of pocket and often at a profit!
The Nautilus system I bought was actually very clever, as it combined a smith machine with a plate-loaded cable system with multiple positions for the handles. Here’s a picture of it just after I put it together:
Nautilus NT-CC1
And here’s a picture of the bench it came with. One downside to selling the PowerLift was I had to sell the FID (Flat-Incline-Decline) bench it came with. The bench that came with the Nautilus was not as good.
Nautilus FID Bench
The main problem with the bench is the fact that it widens at the seat. This becomes quite irritating when doing movements where you’re lying down because I have been gifted with legs of a man 6 inches shorter than I am, and unless you have super long legs you have to separate your legs to let your feet touch the floor. A minor irritation but an irritation nonetheless. The Nautilus system also came with Nautilus Olympic plates, which was nice because I was starting to need more weight plates!
Dlingeon Version 2.1 (February, 2009)
One of the main pieces I had been missing from a commercial gym was a leg press. They take up quite a bit of space and they are really only good for a few movements, so it was hard to justify the purchase, but I had created space selling the PowerLift and had saved up enough that I could finally pull the trigger. Originally I wanted to buy the BodySolid leg press/hack squat combo but I found someone selling a Northern Lights unit that also converted from leg press to hack squat and they were asking about half of the retail price. Decision made. Here’s a pic:
Northern Lights Leg Press/Hack Squat, configured for hack squats. To switch to leg press the back pad can be moved to the foot plate and there’s a metal foot plate that can be lifted up behind where the back pad is in the picture.
Dlingeon Version 2.11 (April, 2009)
I had been looking for a seated calf machine for some time. Once again it has very limited use so I wasn’t interested in spending a ton of money on it. I kept my eye on kijiji and craigslist and one finally came up, listed for $150. I offered $125 and they agreed. It doesn’t take up much space so it was no problem fitting it in. It comes fitted for standard weight plates so I did have to buy an Olympic adapter retail – $15.
One issue with it that I live with to this day is that there is no safety stop position, so if you get in trouble and can’t re-rack the weight you have to let it fall to the ground and get your legs out of the way.
Northern Lights Seated Calf
Around this time, a friend of mine called me to tell me that his neighbour was selling a VKR – that’s home gym speak for a Vertical Knee Raise station and it really means one of those contraptions that you can use for dips, pull-ups and that also has a back pad and handles with armrests for hanging knee raises. They’re really versatile and a great addition to your gym. Since I already had a dip station though I wasn’t going to bite, but then my friend told me his neighbour only wanted $75 for it, and he would bargain down to $50 for me. That was too good to pass up so I listed my dip station for $125, sold it for $100, and bought the VKR for $50.
Standard Home Gym VKR
Sadly, I only used this for a few workouts. A friend of mine was over for a workout and watched me doing weighted dips on this unit. I weighed about 220 lbs at the time and was hanging 90 lbs from a belt around my waist, and my friend noticed that the handles were bending and the main posts were as well. That was when I learned that not all VKR’s are created equally. I sold it almost right away for … wait for it … $275! Then I replaced it with a Hoist VKR of significantly sturdier construction, which I bought from a guy who had been a silent partner in a gym that had gone under and had all the equipment in a storage unit that he didn’t want to keep paying rent for. I paid $150 for the Hoist VKR. It retails for over $1000.
Hoist VKR
This was a significant improvement over the previous two dip stations. First, it’s rated for weights heavy enough for me and my weight plates, and second, the back pad actually comes off and can be attached at the back for incline ab exercises. It also turns out this unit was a big attraction and here’s a picture of my friend, IFBB Pro Carrie Simmons, demonstrating dips in my gym.
IFBB Pro Carrie Simmons graces the Dlingeon and demonstrates proper dip form!
Dlingeon Version 3.0 (June, 2009)
Well the Nautilus Smith was fun for a while, but I didn’t like the bench it came with and I didn’t like the fact that I couldn’t do pulldowns on it. I also felt it was taking up too much space. So in June ’09 I decided to sell it and replace it with a multi-gym cable system. I sold the Smith for $700 and bought a Northern Lights multi-gym for $520.
Northern Lights Multi-Gym – dog butt not included as standard equipment.
I also used the proceeds from the Smith to buy a Northern Lights preacher bench for $75. Because I sold the FID bench with the Smith, I had to buy another FID bench, along with leg extension attachment. I found these used for $200 and $40, respectively. Northern Lights makes all their plate loaded stuff for standard plates, so once again I had to buy an Olympic adapter – $15.
Northern Lights FID Bench
Northern Lights Preacher Bench
The multi-gym was good for a lot of things, but I noticed immediately that it was built for people with different proportions than me. So for example I never could get the pec-dec to fit my arms properly, and when I did pull-downs my legs were always pretty squished under the anchors, even with them set at the highest position. Strange when you consider that I have freakishly short legs. All that said though, it was usable, and I used it for a long time.
If you’re paying close attention to the pictures, you’ll see the foam piece still in the corner. No problem, except now I have to move a preacher bench to do corner rows. Big deal. You’ll also notice a weird-looking curl bar on the preacher bench. That’s a purchase I regretted almost immediately and sold it right away for $35, then bought an EZ-Curl bar retail for $55 to replace it.
Dlingeon Version 3.01 (December, 2009)
Turns out I didn’t like the Northern Lights FID bench too much. I found the back pad to be too narrow and I was benching in the neighbourhood of 275 lbs at this point, with my bodyweight of 220 lbs or so, and I never quite trusted the tiny hinge at the bottom which becomes the focus of all that weight. So I looked around until I found a used Body Solid FID. Body Solid makes three of these, each one sturdier than the previous. I wanted the sturdiest one they make. I found someone selling one for $250 and bought it, then sold my Northern Lights FID and leg extension attachment for $350. I did have to buy the Body Solid leg extension attachment retail, for $112, so I was down $12 on the exchange. I could live with that for the much higher quality bench! I don’t have any pictures of it alone, but it will show up in pictures later on.
Dlingeon Version 4.0 (July, 2011)
The multi-gym configuration lasted me quite some time, but in July of 2011 I decided that I was ready for a change. I’d been looking at functional trainers and liked the idea of the flexibility they provide. I kept my eye out for a used one that was priced well as they’re seriously expensive, and finally found a trainer who had a gym but was shifting his focus from weights to TRX, and he had a Tuff-Stuff functional trainer that was gathering dust. So I sold my multi-gym and bought his functional trainer. And for a bonus, he’d paid extra for the Smith attachment to the trainer, so now I had a full functional trainer and a Smith machine!
Tuff Stuff Functional Trainer/Smith
With some moving around of equipment I was able to fit it all in.
Full gym except for functional trainer
Dlingeon Version 4.0 (July, 2012)
I love the functional trainer/Smith machine, but one serious drawback is that there is no good way to anchor yourself for pulldowns. This started to annoy me, so I decided to sacrifice the space my seated calf machine was taking up, and I bought a used Lamar lat tower. The guy that sold it to me had a lot of attachments that I didn’t need, and a lot of weight I didn’t need either. By the time I was done selling the stuff I didn’t need, as well as my seated calf machine, I was $100 and one lat tower richer than before. This is the current state of my gym, and here’s a virtual tour video I took a little while ago. I used a Samsung Tablet to take the video, and apparently the proportions aren’t ideal for YouTube, but you can see everything.
In Conclusion (finally!)
I have to say that I absolutely love having a home gym. My workouts are better here, without the distractions of the commercial gym. Nobody but me ever sweats on the equipment, and all the gym members always put away their weights and dumbbells. I have some computer speakers set up and I plug my iPhone into them when I train, so the music is always exactly what I want to hear. I’ve made huge gains in size and strength. Here are a few videos of my favourite lifts, to finish off this blog, which according to the editor I’m typing in, has just reached 5122 words!
So imagine someone comes up to you and says “practice makes …” and gives you that annoying lilty tone at the end that suggests you’re supposed to finish the sentence for them. If you’re in the mood and want this imaginary person to be extra irritating, imagine they are raising one eyebrow when they do it. Got the picture? Good. Now assuming you decide not to punch them in the throat, the word that comes to mind is most likely “perfect”. Practice makes perfect. That’s the saying and that’s what we’ve always been told. Math teachers assign homework to exploit this principle. Gymnasts spend hours doing handsprings for the same reason. Orators rehearse speeches. Singers croon in the shower. The list goes on and is lengthy indeed. There’s only one problem though, and it’s a big one. Practice does not make perfect.
Practice makes permanent.
And there’s a gigantic difference between the two concepts. Now I wish I could take credit for the saying “practice makes permanent” but I can’t. I first heard it at a PD day seminar, and if you Google the phrase (go ahead, open a new tab and try it – I just did), you’ll find tons of bloggers and videos discussing it. I guess I’m just one more in the sea of philosophers on this. But it’s my blog so I have no compunctions about sharing my take, especially as I was very recently stung by this concept, and I should know better. Here is the sordid tale:
3 years ago at the age of 40 I performed in my first ever play, and it happened to be my favorite play – Les Miserables. It was an amateur production, and I was overjoyed just to be a part of it. I had many different roles in the ensemble and the experience was unforgettable. I forged many friendships and have been performing in musicals ever since. The day we finished our last performance of Les Mis, I vowed that if I got the chance to do the play again I wanted to get a lead role – Valjean or Javert. I committed to improving my singing so that when the time came, I would nail the audition. I began singing every day, every chance I got. In the shower, in the car – even just hanging around the house. I do have some natural talent which I credit my paternal grandfather with, since he was a world-famous Cantor. He used to coach me when I was young, before my voice changed. However I had no real formal training and had let my voice decay in my adult years. So I had a long way to go but a foundation on which to build.
Fast forward to June 2012. I performed in Jesus Christ Superstar and, owing largely to a paucity of male talent in the cast, I got the role of Jesus. I was elated but also scared to death. That is a ridiculously difficult role vocally, and would never have gone to me if there had been a tenor around (I’m really a baritone). Preparing for and performing Jesus did things for my technique and range that I had only dreamed of. Working with the director, who is an extremely talented vocalist and teacher, I brought my voice forward light years. My performance wasn’t perfect for sure, and Ted Neely certainly has nothing to fear, but I was pleased. Now skip to the present. Les Mis is back! This is my chance. I am a significantly improved singer and I’m ready to nail the audition. The circle has come full. I will redeem myself and fulfill the dream.
Here’s the thing about Les Mis. It’s been my favorite play since I was 20 years old. I’ve been listening to the soundtrack for 23 years. 23 years! I know every word of every song from beginning to end. I can sing the play – all the parts – from memory from beginning to end. And I do. Often. With the car windows down and my kids in the back. They love it. I think.
The thing is though, I mostly do it a capella. Because I can’t play any instruments and my iPhone objects to being used in the shower. So for over 23 years I’ve practiced every song, mostly without any accompaniment. That’s a lot of practice!
OK. So the audition comes. The director asks me to sing a song of my choice and I sang Stars. Then he asked me to sing parts of Empty Chairs at Empty Tables, Bring Him Home, Master of the House, and Do You Hear the People Sing. I sang them all getting happier each moment at how well my Jesus-trained voice was holding up. I really thought I sounded amazing. This director takes a few days to cast the show after auditions. Unlike Jesus, there is a lot of serious male talent in the cast, so even though I thought I did the best I could, I was prepared to not get the fairy tale of a lead role.
I did not. And the men that did beat me fair and square. They are truly amazing. But I still wanted feedback from the director, who knows me very well. I went to see him the following week and told him I thought it was my best singing to date. He disagreed. He told me my pitch was off in quite a few places.
My pitch? Off? I did not see that one coming.
I’ve had and continue to have pitch problems for sure. It plagues me. But I can always hear it. That’s a good thing, because if you’re going to have pitch issues at least if you can hear it you can take steps to repair it. But I honestly did not hear a single bad note this audition. What the hell? I really had to think about that one. And then it occurred to me. Practice makes permanent. I’ve been singing Les Mis for so many years a capella that I’ve grooved notes into my subconscious that sound right to me without an orchestra, but that are a half-tone off in certain places. And when I was singing at the audition, I didn’t even hear the piano, because I’ve sung these songs so many times it’s like putting on an old baseball glove. I practiced the wrong notes. A lot. And they became permanent.
Lesson learned. The only consolation is even had I been pitch-perfect I still would not have landed a lead, because the male leads are completely out of my league. But it hurt to hear I was off.
Well that’s the story that I wanted to start off with, and as it turns out it tells the tale pretty well. What it all boils down to is that practice is invaluable, but it is imperative that we be sure we are practicing perfect. The saying should not be “practice makes perfect”. It really should be “perfect practice makes perfect”. And the key is to make sure we are practicing correctly. It’s not a trivial thing. How can we know? Some easy tips:
Check regularly with an expert (your teacher, your coach, a trainer etc), even if you are an expert. For example, in the gym I’ve often seen experienced lifters consistently lifting with bad form and they don’t even know it.
If it’s singing or something physical, record yourself and listen/watch often. Seeing or hearing yourself from the outside is a whole different experience than what you feel when it’s happening. Using mirrors is good, but mirrors lie. Everything you see there is from the level of your own eyes. Most people won’t be seeing you from that angle. Plus, when the person watching you is not you, you don’t have the same constant feedback you use instinctively to correct things when you are looking into a mirror.
Don’t get complacent. Sometimes a slight deviation can creep in to something that was on track and though you think you’re still practicing perfect, you’re not.
For me, I’ll continue to practice. But no more singing a capella! It’s a trap and I fell for it. I won’t anymore. Now if only I could learn to play the piano …